What is Reverse Image Search?
In general, people search for information on the internet by typing a relevant keyword, phrase or a small sentence into the search bar of Google, Bing and other web browsers. Browsers can also perform an Image search and bring up relevant search results, if they are provided with the URL of an image or Photo. Using an image or photo to search for information on the internet, instead of using a key word or phrase is known as “Reverse Image Search”.
Who Uses Reverse Image Search?
Going by popular saying “A Picture is Worth a Thousand Words” Fake News Websites and Toxic Social Media pages often misuse Photos and Images to convey misleading information. This has created a need or market for Fact Finding websites, which make use of Reverse Image Search to debunk lies, propaganda, half-truths and misleading information being spread on the internet. Performing a Reverse Image Search basically leads you to the original source of the image and also brings up access to other websites where the image was used. This information is further analyzed by trained people at Fact Finding websites to present a convincing report about a viral social media post or an article on a website being misleading or blatantly propagating lies.
1. Reverse image search on PC and Mac using Google
Google’s Image Search works best on a desktop or laptop computer and it can be used irrespective of the web browser (Chrome, Safari, etc.) on your computer.
Open the web browser on your computer.
Visit the website or social media page where the image is located.
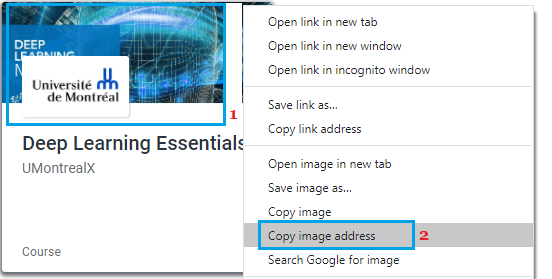
Right-click on the Image and select Copy Image Address option.
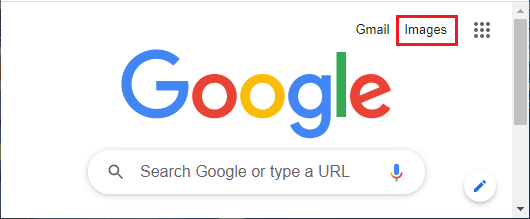
Go to google.com in a new browser tab and click on Images link located at the top-right corner.
Next, click on the Camera icon located in the Search Bar.
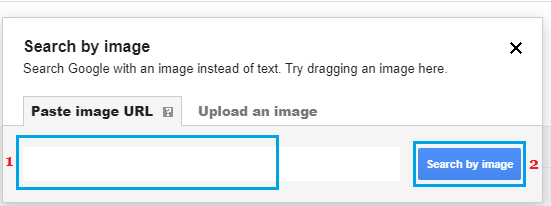
On the pop-up, paste the Image URL (that you copied in step#3) and click on Search by image button.
In the search results, you will find all the websites, including the original website on which this particular image first appeared. Most of the times, information provided by a reverse image search provides enough clues and reasoning to call out or debunk an article or social media page trying to push fake news.
2. Reverse Image Search on iPhone using Google
Since, Google’s image search works best on a desktop site, you will be required to access the desktop version of Google to perform a reverse image search on iPhone.
Open Safari browser > visit the website where the image that you want to investigate is located.
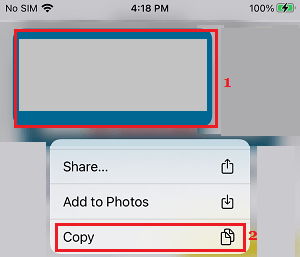
Tap and Hold on the Image and select the Copy option in the menu that appears.
Open a new browser tab and visit images.google.com.
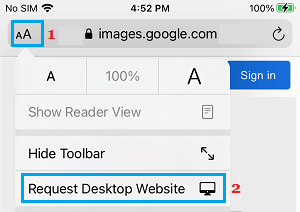
Once you are on Google, tap on the AA letters and select Request Desktop Website option.
On the Desktop site, tap on the Camera icon to open Google Image search.
On the pop-up, Paste the URL of the image (that you copied in step#2) and tap on Search by image option.
This will land on Google Image Search results, listing both the original and other websites which had published this particular image.
3. Reverse Image Search on Android Phone using Google
Similarly, you can also perform a Reverse Image Search on Android Phone using Google Image search option.
Open Google Chrome > visit the website or social media page where the image is located.
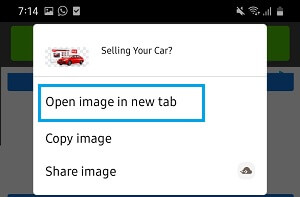
Tap & Hold on the Image > select Open Image in a new tab option.
Copy the URL of the image from the new tab.
Open a new browser tab and visit images.google.com.
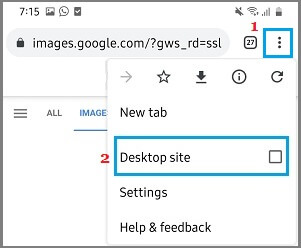
Once you are on Google, tap on 3-dots menu icon and select Request Desktop Site option.
On the Desktop site, tap on the Camera icon to open Google Image search.
On the pop-up, Paste the URL of the image (that you copied in step#2) and tap on Search by image option.
This will lead you to relevant search results for the image, including the website which originally published this particular image.
How to Find the Location Where a Photo Was Taken How to Disable iCloud Photo Link in iMessage
